
Whether someone wants to ask a question, schedule an interview, or apply for a job, every website needs a reliable way for visitors to get in touch.
Adding a contact form to WordPress makes it easy for people to reach out — and helps you stay organized. With the right plugin and a few custom fields, you can create a form that fits your business perfectly and makes it easier to respond quickly and efficiently.
This guide covers nine simple steps to add a contact form in WordPress, plus the best ways to filter out spam before it hits your inbox. It also addresses some of the most frequently asked questions about contact forms, from setup to security.
1. Choose a contact form plugin
The easiest way to add a contact form to your WordPress site is with a plugin. There are plenty of free and premium options available, many of which make the setup process quick and painless.
Most premium plugins include ready-to-use templates, along with advanced features such as spam protection, file uploads, and conditional logic.
If you’re looking for a no-cost option, Contact Form 7 is a popular choice. It’s free, works on unlimited sites, and has been around for years. Just keep in mind — it comes with a bit of a learning curve, especially if you’re new to WordPress.

Also worth noting: Contact Form 7 doesn’t store form submissions by default. If you want to save entries, you’ll need an extra plugin like Flamingo to handle that.
You can also accept file uploads, display a confirmation message upon submission, and extend the plugin with several add‑ons.
If you’re looking for a simple, beginner-friendly way to add a contact form to your site, Jetpack Forms is a top choice.

It works right inside the WordPress Block Editor, so adding a form is as easy as inserting any other block — no need to wrestle with shortcodes or extra steps. Just drop in the Form block, customize a few settings, and you’re ready to go.
With Jetpack Forms, you can:
- Edit and rearrange form fields at any time
- Change the confirmation message users see after submitting
- Redirect visitors to a thank-you page or custom URL
Need users to upload files? No problem. Want to prevent spam? Jetpack integrates seamlessly with tools like Akismet to keep your inbox clean. It even works alongside Jetpack’s comment system, giving you multiple ways to manage user interactions in one place.
2. Install and activate the plugin
This article utilizes the free Jetpack Forms tool for this tutorial. You can install it right from your WordPress dashboard:
- Navigate to Plugins → Add New
- Search for “Jetpack”
- Click Install Now
- Once installed, click Activate
After activation, you’ll be prompted to connect Jetpack to your WordPress.com account. This account is free and only takes a minute to set up. Once connected, you’ll have access to Jetpack’s full range of features.
3. Create a new WordPress contact form
With Jetpack installed, you’re ready to add a contact form to your site.
- To get started, open an existing page or create a new one by going to Pages → Add New
- Click the + icon to add a block
- Search for “Form” and select the green Form block
- Choose a form template — Jetpack offers options like contact forms, feedback forms, and more
- Click Save or Publish to update your page
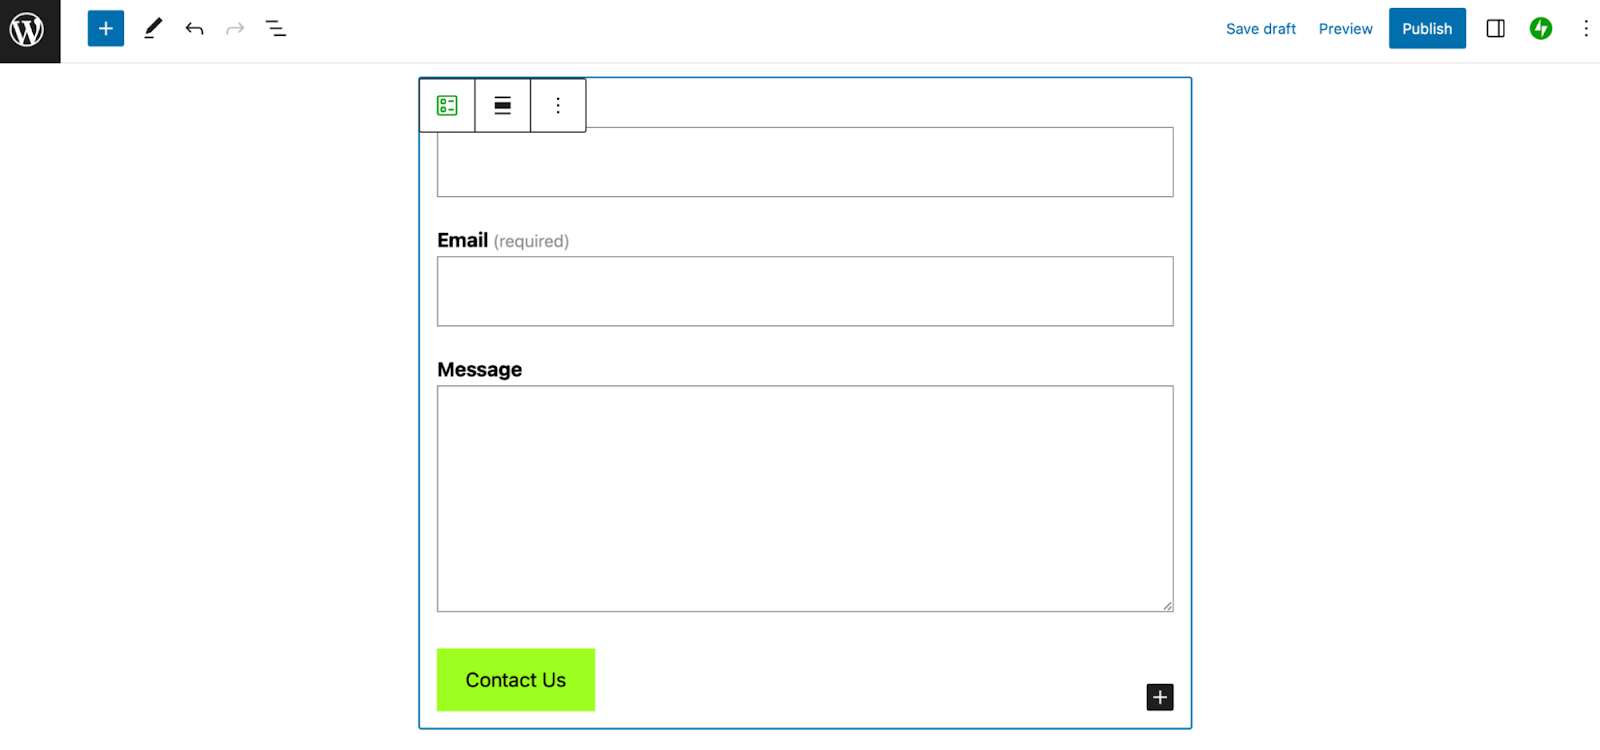
Depending on the template you selected, you’ll see a basic form on the page with fields like Name, Email, and Message, along with a Submit button.
4. Customize the form fields
While the default fields in your form templates usually include email, name, and message, you have the option to customize them according to your needs.
To edit a field:
- Click on any field to select it
- Use the toolbar to change the field type (e.g., switch Name to Phone, Date, or Checkbox)
- Update the field label by typing directly into the text area
- Click the asterisk icon to make a field required
- Click it again to make the field optional
To add more fields, you can do so with the click of a button.
Adding a new field:
- Click the blue + icon
- Search for “Jetpack” to view available field blocks
- Select a field and drag it into position
If you need this new field to be higher than the previous one, or if you placed it incorrectly, you can reorder fields using the up and down arrows in the block toolbar.
When your form looks the way you want, click Save or Publish to apply the changes.
5. Configure the form block settings
Once you’ve customized your form fields, it’s time to set where form submissions go and what visitors see after submitting.
To access your form settings, click on the Form block — be sure to select the whole form, not just a single field. Then, open the Block settings panel on the right side of your screen.
In this panel, you can customize several options:
- Manage responses: View and manage user submissions directly in your dashboard.
- Submission settings: Display a custom thank-you message or redirect visitors to another URL after form submission.
- Email connection: Set the email address that will receive submissions and customize the email subject line.
- CRM connection: Integrate your form with Jetpack CRM or other compatible tools.
- Newsletter connection: Link your form to third-party newsletter plugins to grow your mailing list.
Remember to click Publish or Update after making any changes to save your work.
6. Style the form
Now that your form is set up and you’re happy with the fields, it’s time to get creative by adjusting colors, fonts, sizes, and more.
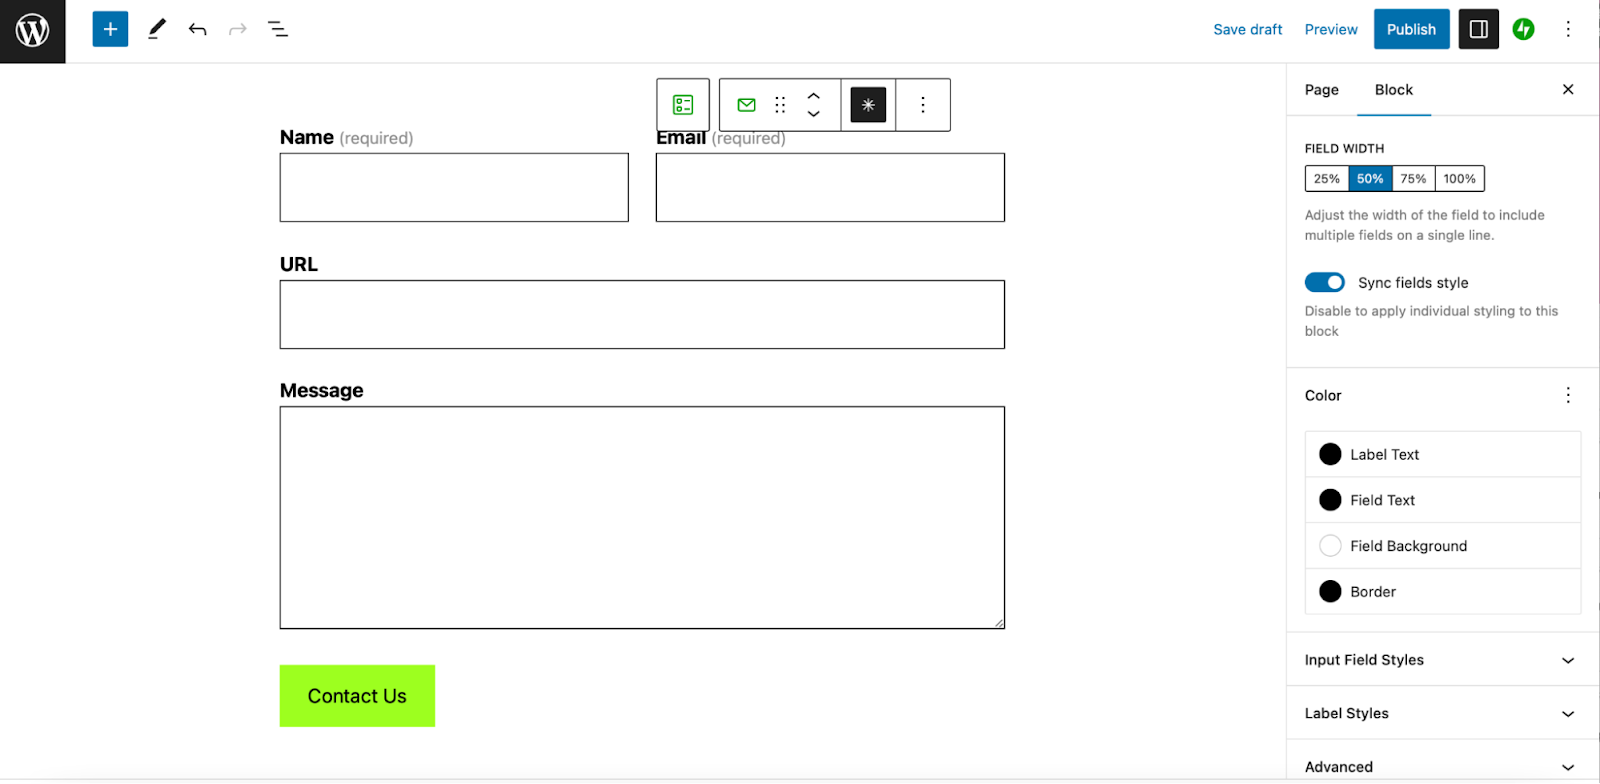
To start styling, select any form field and open the Block Settings panel. Here’s a quick overview of what you can do:
- Field Settings: Adjust the width of individual fields — perfect for placing fields like Name and Email side by side.
- Sync fields style toggle: Apply your style changes to all fields at once for a consistent look.
- Color: Change the background, text, label, and border colors.
- Input Field Styles: Modify the text size and line height inside your fields.
- Label Styles: Adjust the text size and line height for your field labels.
- Advanced: Add custom CSS for more detailed styling if you want.
Whenever you’re editing your form’s appearance, keep accessibility in mind to ensure all visitors can easily read and interact with the fields. Clear contrast, readable fonts, and intuitive layouts make your site welcoming for everyone.
7. Add spam protection (but avoid CAPTCHA)
The main drawback of adding a contact form to your website is that it can attract unwanted spam from bots and malicious actors.
This is where Akismet Anti‑Spam shines. Built by the team behind WordPress.com, it integrates automatically with Jetpack and many other plugins, silently filtering out spam with over 99.99% accuracy.

Getting started with Akismet
To get started, you’ll need an API key. Personal blogs can utilize a free plan, while commercial sites require a paid subscription. If you’re using Jetpack Security, Starter, or Complete, Akismet is already included — just connect Jetpack to your site.
Once active, you can confirm everything is working by heading to Settings → Akismet Anti-Spam in your WordPress dashboard.
There, you’ll see how many spam comments the tool has already blocked. You can also configure it to display a privacy notice and adjust settings to manage spam more effectively.
Protecting your forms with Akismet is ideal because it keeps spam out without adding friction for users. While some WordPress sites turn to CAPTCHA as an alternative, those solutions often add extra steps that can be frustrating to visitors.
8. Add the contact form to your site
Now that your contact form is ready to go, it’s time to add it to your website. You can embed it directly on a page, or place it in key areas like your header, footer, or sidebar — wherever it makes the most sense for your visitors.
Let’s cover how to add the contact form with the two most used editors for WordPress, the Site Editor and Classic Theme editors.
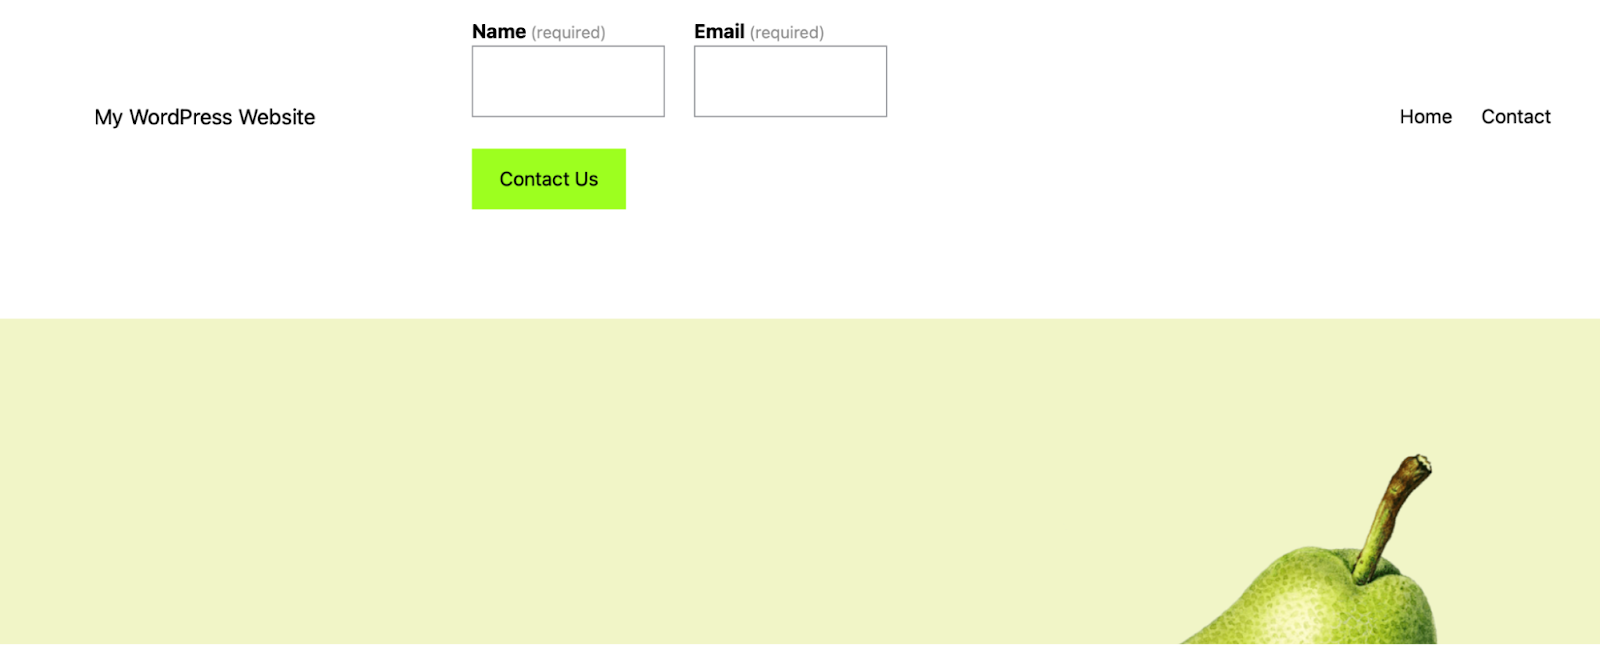
Add the form to a header, footer, or sidebar with a block theme
The Site Editor has transformed how you design your WordPress site by letting you customize headers, footers, and other template parts — all from a single interface. However, you can only use this feature if your site uses a block theme, which utilizes WordPress blocks for greater design flexibility.
Here’s how to add your form using the Site Editor:
- From your dashboard, go to Appearance → Editor
- Click Template Parts, then choose the area you’d like to edit (e.g., Header) and click the pencil icon
- Click the + icon to add a block, then search for “Form” and select the Jetpack Form block
- Choose a form template to insert
- Use the block toolbar and settings panel to adjust field widths, remove unnecessary fields, or style the form to better fit the space
- Once you’re happy with the layout, click Save to publish your changes

Additionally, you can reduce the size of fields so that you can make your contact form fit nicely within your website header.
Add the form to a header, footer, or sidebar with a classic theme
As mentioned above, the easiest way to add a WordPress contact form to your header, footer, or sidebar is to use the Site Editor. This is recommended since the Site Editor enables you to edit templates and template parts without code (or additional plugins).
If you’re using a classic theme, you won’t have access to the Site Editor, but you can still add a contact form to your header, footer, or sidebar using widgets in the WordPress Customizer.

To add a form with a classic theme:
- Go to Appearance → Customize from your WordPress dashboard
- Click Widgets, then choose the widget area you want to edit (like your footer or sidebar)
- Click the + icon to add a new block
- Search for “Form” and select the Jetpack Form block
- Choose a form template
- Use the block toolbar to edit or add fields, mark them as required, or reorder them as needed
- Select the whole form block, then click Show more settings to configure submission options, style your form, and manage responses
Once you’re done, click Publish to apply your changes.
9. Test your contact form
Before calling it done, it’s good practice to run a full test of your contact form. Even a simple form can have issues, like missing required fields, formatting glitches, or emails not sending properly. Catching these issues now ensures your visitors won’t encounter problems later.
View your form like a visitor
- Log out of WordPress, then open a new browser window and visit your website.
- If your form is on a specific page, navigate directly to that page.
- If it’s in your header or footer, head to your homepage.
- Resize the window to see how your form looks on different screen sizes.
- Try selecting each field and entering text to make sure everything is responsive and easy to use.
Submit a test entry
- Fill out the form using sample information and click the submit button.
- Look for issues like fields not accepting input, required fields not validating, or layout problems.
- If you’ve set a custom thank-you message, make sure it appears correctly.
- If your form sends confirmation emails, check your inbox (and spam folder) to confirm delivery and formatting.
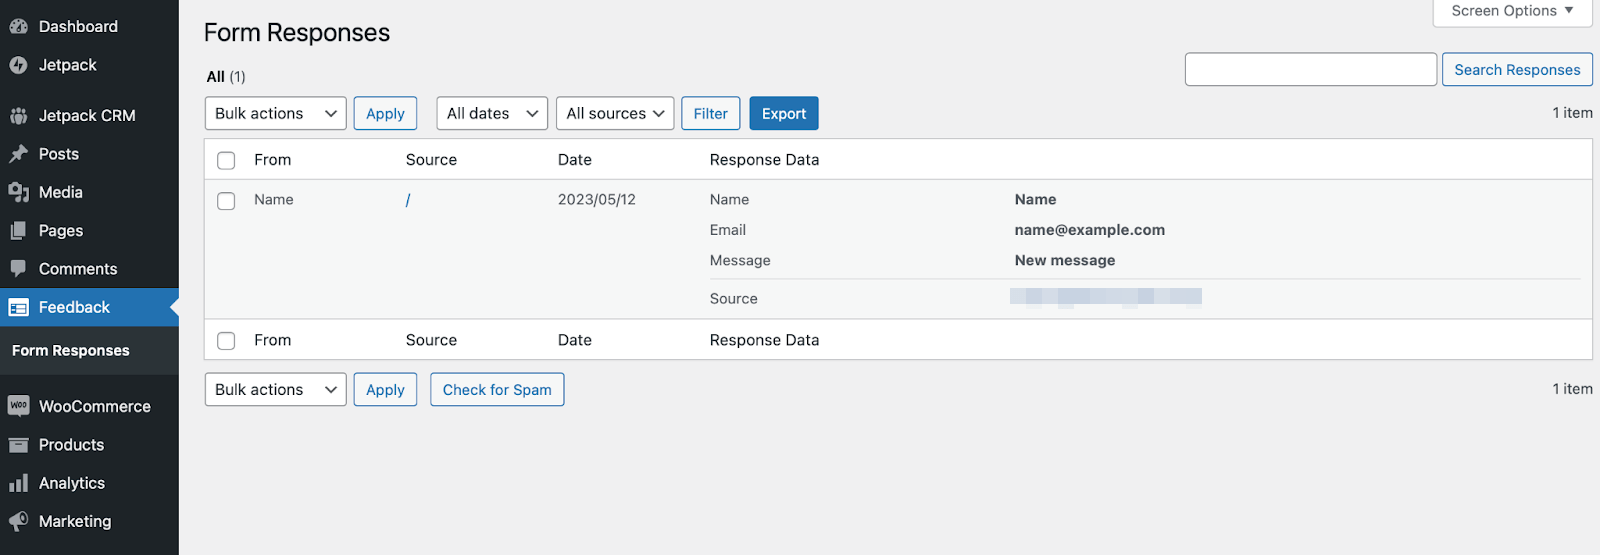
Check the submission in your dashboard
- Log back into WordPress and go to the page or post where you created the form.
- Click View Form Responses from the editor to confirm the test submission was received.
- You can also go to Feedback → Form Responses in your WordPress dashboard to review all entries in one place.
Thorough testing helps ensure your form looks great, functions correctly, and delivers messages reliably, so your visitors have a seamless way to reach you.
Akismet: AI‑powered anti‑spam for WordPress contact forms
Without a contact form, visitors might struggle to reach you, even for a simple question. That extra friction can create a poor user experience and cause potential leads to drop off.
Thankfully, adding a solution like Jetpack provides a clean, reliable way for users to get in touch. The Jetpack Form block lets you fully customize the form’s appearance, redirect visitors to a thank-you page, and control where submissions go — all without working with code.
To keep your forms secure, pair them with Akismet Anti-spam. Built by the same team behind WordPress.com, Akismet automatically filters out spam from both comments and forms without adding any friction for your users. It works behind the scenes, quietly blocking junk submissions with industry-leading accuracy. Plus, it helps keep your site fast by preventing unnecessary spam from taking up space.
Getting started is easy, and if you’re using Jetpack Security, Starter, or Complete, Akismet is already included.
Ready to put your spam defenses on autopilot? Explore Akismet’s complete feature set, including options for enterprise-level protection.
Frequently asked questions
Let’s take a look at some of the most frequently asked questions (and answers) regarding this topic.
Are there any free contact form plugins available for WordPress?
Yes. There are plenty of free contact form plugins for WordPress, including Contact Form 7 and Jetpack.
While Contact Form 7 is a great choice for more experienced users to create advanced forms, Jetpack is the best content form plugin for beginners. It’s simple to install, quick to set up, and automatically works with Akismet, when enabled, to block spam submissions automatically.
Can I create a contact form without a plugin?
Technically, yes — but it’s not recommended unless you’re an advanced user. Without a plugin, you’d need to write the HTML, CSS, PHP, and JavaScript to build and validate your form, as well as handle error messages and spam filtering manually.
Using a plugin like Jetpack is much more efficient. It provides a visual builder, allowing you to drag and drop fields into place, and handles technical details such as form submissions and spam protection.
How can I optimize my contact form conversion rate?
There are tons of ways to optimize your WordPress contact form conversion rate. For example, you can limit the number of form fields. Then, when visitors see that your form is super quick and easy to complete, they may be more likely to convert.
It also helps to maintain a clean and intuitive layout, with clearly-labeled fields.
Make sure your form is visually-appealing and functions smoothly on smaller screens for mobile users. This is especially vital since over 60 percent of the global population uses a mobile device to go online.
How can I prevent spam submissions on my contact form?
The easiest and most effective way to prevent spam is with an AI-powered solution like Akismet. It blocks spam with over 99.99% accuracy (no CAPTCHA required) and maintains a seamless user experience.
Akismet integrates automatically with Jetpack Forms, but it can also be used with other form plugins.
To get started:
- Go to Plugins → Add New
- Search for “Akismet.”
- Click Install Now, then Activate.
If you’re using Jetpack, Akismet is included with certain plans, and you’ll find it under the Jetpack tab in your dashboard. From there, you can set up your account or enter your API key to start protecting your forms immediately.
Should I use CAPTCHA on my contact form?
While CAPTCHA is a common way to stop bots, it can make your forms more frustrating for real users. These systems often ask visitors to solve puzzles or check boxes, which adds friction and can even reduce conversions.
In fact, Moz found that using CAPTCHA can noticeably lower conversion rates. On the other hand, ConvertKit discovered that using Akismet helps preserve a smooth, user-friendly experience.
Akismet provides powerful, behind-the-scenes spam protection without requiring users to jump through hoops. It’s an ideal alternative for sites that want to reduce spam while keeping things easy for visitors.
What is Akismet, and why should I use it?
Akismet is an AI-powered spam prevention plugin developed by Automattic, the team behind WordPress.com. It automatically filters out spam on your contact forms and comment sections — quietly working in the background without disrupting the user experience.
Unlike CAPTCHA, Akismet doesn’t slow things down or frustrate your visitors. It blocks spam with 99.99% accuracy and integrates seamlessly with Jetpack Forms and many other plugins.
Used by over 100 million websites (including brands like Microsoft, Kit, Bluehost, and WordPress.com), Akismet is one of the most trusted anti-spam tools available. With a range of plans for personal blogs and commercial sites alike, it’s easy to find a solution that fits your needs.
