
Let’s face it: the internet isn’t always a safe place and malicious attacks can come from anywhere. But one good solution to protect your site from hacks and spam is to block malicious IP addresses.
Fortunately, you don’t have to be a tech whiz to protect your site. By understanding how IP addresses work and how you can manage them on your WordPress website, you can help prevent spam and secure your data.
In this article, we’ll introduce you to IP addresses and cover why you might want to block some of them. We’ll also show you how to find and remove any problematic ones. Finally, we’ll share three extra ways to prevent WordPress spam.
An introduction to IP addresses
Every single one of your users has an IP address. IP addresses are unique numbers that identify which internet connection a visitor is using. That means the address stays the same, even if the person uses a different account.
IP addresses appear as four sets of numbers divided by individual dots. For reference, here’s what the basic structure looks like, though it also might be longer and more complicated:
123.45.678.9
WordPress collects this number and stores it in an access file whenever someone connects to your site. But some visitors may be using a Virtual Private Network (VPN) to prevent this data storage. Given this possibility, it’s even more important to block any malicious IP addresses that you can identify.
Why block a specific user or country IP from WordPress?
The IP addresses that access your site will be perfectly harmless most of the time. Still, there’s always a chance that you’ll want to exclude some. Here are a few reasons why you might need to blocklist an IP address on WordPress website:
1. Stop spam comments
A comments section can be a vital part of a website’s community. That’s because it offers connection: your visitors can join the conversation, interacting with your content and each other.
Organic comments will typically be relevant and intelligible, like the below example:

The chances are good that real, well-intentioned visitors wrote these comments. Still, this won’t always be the case. Some people or bots will use the comments box as an opportunity for spam.
A spam comment might just be completely unrelated commentary. It might also be garbled, unintelligible, or gibberish. These types of spam can drown out real comments and make people’s experience on your website less enjoyable.
Additionally, spam can cause search engines to flag your site as unsafe. So blocking the IP addresses behind spam can help preserve your search engine optimization (SEO) efforts.
2. Keep out potential hackers
Gibberish comments aren’t the only concern. Hackers might use comments to promote malicious links. These URLs can lead to sites designed to steal information from you and your audience.
Unfortunately, this danger isn’t limited to comments. Hackers may try to gain access to your site with repeated login attempts. These are commonly referred to as brute force attacks. They usually come from one IP address, meaning that blocking that address could solve your problem.
Finally, there’s also a more advanced technique where malicious actors try to inject bad code into your site. By using entry ports like your comments section or sign-up forms, they can try to trick your website into giving them access. Once they’re in, they can do some serious damage to your site.
3. Limit access to authorized users
A membership model is a popular way to run a website. The benefits of more engaged users and lucrative subscription models can be desirable. Still, there’s always a chance that someone tries to access an area they haven’t paid for.
Membership websites aren’t the only ones who have to deal with this. Any site with user roles may need to be on alert.
For example, a hacker might try to access an admin-only area. Once they’re in, they’ll have full access to your website.
In both cases, blocking the visitor’s IP address is easy. It just takes a few minutes to prevent future attempts. Overall, we recommend learning this skill no matter which kind of site you run.
How to find a user’s IP address in WordPress
If you want to block an IP address, the first step is to identify it. Here are two ways that you can uncover someone’s IP address in WordPress:
1. Use the comments section
Like we mentioned before, WordPress automatically stores the IP address of every visitor. Fortunately, discovering one is pretty easy — especially if the spam comes from your comments section.
Start in your WordPress dashboard. Then, go to Comments and look under the Author column.
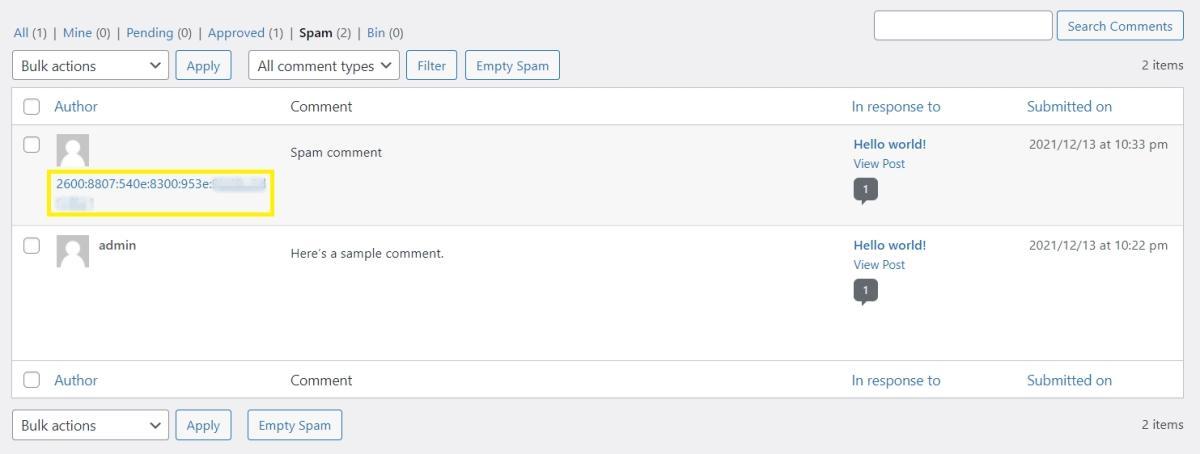
From here, you can view the IP address of whoever left the comment on your WordPress website. You should see this data regardless of the post.
2. Check the cPanel access logs
If you can get to your website’s access logs, you can use them to check IP addresses.
Start by going to your hosting account. Then, find the cPanel dashboard, look for the area labeled Logs, and click on Raw Access.

From here, you’ll be able to click on your domain name and download the access logs. After extracting the records, you should be able to see the IP addresses that have tried to interact with your website.
We recommend looking through this record to find any addresses that have made many requests. If you find one, chances are good that they’re malicious, and you may want to consider blocking them.
How to block specific IP addresses from accessing your WordPress site
Once you’ve discovered the IP addresses that you want to block, you have a few options for doing so. Here are four different ways to get started:
1. Use the comment blocklist feature
The first route is arguably the easiest: using WordPress built-in features. Start by collecting the IP addresses you want to block from your WordPress website. You can single out one or compile as many as you need — it’s up to you.
Then, all you have to do is change a few settings. Start in your WordPress dashboard, then go to Settings → Discussion. Scroll down until you find the Disallowed Comment Keys box.

From here, you can grab the list of addresses you made earlier and paste it into the box. Make sure that you only include one IP address per line. Now, anytime someone with that IP address tries to leave a comment, it will go directly into the trash. Keep in mind that this method still allows the person or bot to access your site, just not post any comments.
This setting serves two main purposes. For one thing, it can cut down on your workload. You won’t have to worry about assessing a massive amount of comments that you already know are spam.
On the other hand, this setting also helps protect your visitors. That’s because it doesn’t matter what type of spam that IP address is trying to leave — whether it’s gibberish or malicious links — every single message will be blocked.
2. Use a plugin to block entire countries
If you see that most IP addresses are coming from a specific country, the above method may not work for you. It would require you to constantly monitor your comments and add to a seemingly never-ending list of blocked users.
Instead, you can opt to block an entire country. This setup may end up being less work, especially when you use a plugin like iQ Block Country.
Start by adding the plugin to your website. After you’ve activated it, you should get an alert asking you to upload a database file. To access this file, you’ll need to sign up for an account on the MaxMind website. Don’t worry — it’s all free.
After you’ve logged in, you can go to Database Products and Subscriptions → Download Databases. Find the Country Database and download it. Then, extract the file and upload it using a File Transfer Protocol (FTP) client.
Once you’ve completed the upload, go back to the iQ Block Country plugin. Choose whether you want to block addresses from your site’s front or back end. You can also select both.
Navigate to the tab for the area you want to restrict. Then, select the country you wish to exclude. If you’re going to choose several, hold down the ctrl key while selecting. Finally, save your work. Your website should now ban any IP addresses from your selected countries.
This method is only recommended if you are certain that all traffic from a specific country will try to negatively influence your website. If you have genuine traffic from those countries, you might want to find an alternative method to block spam.
3. Edit your .htaccess file
Another option is to edit your .htaccess file directly. If you don’t want to get too involved in your website’s code, you may want to choose another option. A single mistake or edit could potentially break your site.
If you’re confident in your ability to edit files, you can use this method as a fast way to ban IP addresses. Nevertheless, we still recommend backing up your site beforehand if something goes wrong.
Gather the IP addresses that you want to ban. Then, log in to your site using your FTP client of choice. Once you’re in, look for your website’s root folder. It’s most likely named after your domain or called public_html.
Open that folder and find the file named .htaccess. Note that the .htaccess file could be hidden and, depending on the FTP client you use, you’ll need to turn on the option for showing hidden files. Then, use a text editor to open it. Scroll down to the very bottom of the file.
Once you’re there, paste the following code:
Order Allow,Deny
Allow from all
Deny from 111.222.333.444
Remember to replace the example IP address with the one you want to block.
If you want to block more than one address, repeat the final line with the new IP address. Remember to save your work before exiting the file. Now, those specific IP addresses should be denied access to your site.
There’s a chance that an error in the process breaks your site. Make sure it’s working properly and, if there are any issues, restore an earlier backup before going any further.
4. Use cPanel
This method might be particularly convenient if you already use cPanel to discover which IP addresses you want to ban.
Start at the cPanel dashboard for your hosting account. Then, scroll down to the Security section and select IP Blocker.

From there, fill in the fields with the IP addresses you’re trying to prevent. After you save your work, your hosting provider should block those visitors from your WordPress site.
How to remove banned IP addresses
Everybody makes mistakes. Whether you mistyped an IP address or misjudged it as spam, you may need to undo your work. Fortunately, it’s a fairly simple process.
The exact steps will vary depending on which blocking method you chose in the first place. However, the process mostly involves reversing the steps:
- Undo the blocklist method: Return to your WordPress dashboard and delete the IP addresses you want to unblock.
- Undo the iQ Block Country method: Return to the plugin settings and remove the chosen countries or disable the plugin altogether.
- Undo the .htaccess file method: Reopen your .htaccess file and delete the code you added.
- Undo the cPanel method: Return to your hosting dashboard’s IP Blocker tool and remove your chosen addresses from the list.
As you can see, it only takes a few steps to undo this work. However, that time can start to add up if you have a ton of blocked IP addresses. Because of this, we recommend that you carefully pick the ones you want to exclude before going through the process.
Two extra tips to prevent spam on your WordPress website
Blocking IP addresses can be a powerful way to prevent spam. However, it’s not your only option. Here are two more ways you can prevent spam:
1. Filter out contact form spam
Spam can come from more than just comment forms. If you have a contact form on your website, you’ve probably already noticed some malicious submissions. That’s why we recommend spending time on this area of your site.
One way to filter this spam is by adding a reCAPTCHA checkbox. Google offers this tool for free. It’s a Turing test: humans can complete it, but bots can’t.
Adding a reCAPTCHA checkbox to your contact form is a simple way to cut out a large number of junk entries.

If you’re running a membership site with different user access roles, you might also choose to only show the contact form to certain members. Even restricting access to logged-in users can decrease the amount of spam you have to deal with.
But an even more effective way to prevent contact form spam is to use Akismet. It automatically blocks spam form submissions so you never even have to deal with them. And, thanks to an advanced list of IP addresses and spam characteristics, it knows exactly what to watch out for. And it works without a reCAPTCHA, so it’s one less thing for real visitors to deal with.
2. Detect misleading links
Another option is to keep a close eye on the links that appear on your site. Unfortunately, you probably can’t monitor every URL. That’s why we recommend using Akismet.
Akismet monitors all of your comments for spam signals and characteristics, like phishy links. It can automatically detect malicious URLs and block those comments from appearing on your site.
And, if you want to go the extra mile, you can also automatically block all comments that contain a link — or a certain number of links — from your site using WordPress default settings. Simply go to Settings → Discussion in your WordPress dashboard. Then, in the Comment moderation section, change the line that says, “Hold a comment in the queue if it contains 2 or more links” to one link.
Block IPs and eliminate spam
Spam can bog down any website. As more malicious actors try to access yours, you could be looking at a serious problem. Fortunately, blocking IP addresses is a quick and simple way to help keep your site safe from known spammers.
In this article, we introduced you to an IP address and covered a few reasons why you might want to block one. We also showed you four ways to do so. Finally, we provided a couple extra methods to keep your site spam free.
